13.11.19

Block Access to Websites using HOSTS file !!


A website can be blocked on any Windows computer by editing the hosts file.

Locate the hosts file in Windows Explorer.


  • Windows XP and later versions: C:\WINDOWS\system32\drivers\etc\
  • Windows 2000 & NT: C:\WINNT\system32\drivers\etc\
  • Windows 98 & ME: C:\WINDOWS\


Navigate to the proper directory using Windows Explorer. Double-click the hosts file. Choose Notepad from the list of programs to open the file and edit it in Notepad.


Find the line below:


  • 127.0.0.1 localhost


Right underneath it, add the following lines (replacing badsite.com with the site you want to block):

  • 127.0.0.1 badsite.com
  • 127.0.0.1 www.badsite.com


Click on the File menu and click Save. Close the file. 

The site should be blocked in all web browsers and now instead of trying to access that site, the computer will redirect you to the localhost.

19.10.19

Windows 7 Startup Repair


Please start the machine and press F8..

Select repair this computer..

Select advanced options and select command prompt..

x:\> bootrec /fixmbr
x:\> bootrec /fixboot

After that restart the machine and check..


If again the issue comes, please check the following commands..

After select command mode in repairing..

sfc /scannow /offbootdir=c:\ /offwindir=c:\windows

takedown /f c:\windows\winsxs\pending.xml

ren c:\windows\winsxs\pending.xml pending.old

sfc /scannow /offbootdir=c:\ /offwindir=c:\windows

9.10.19

To disable Hibernation: in Windows 10


In Windows 10, you can do this by right clicking on the start menu and clicking 
"Command Prompt (Admin)" 

Type in "powercfg.exe /h off" without the quotes and press enter.

28.9.19

Subnet Mask Cheet Sheet

AddressesHostsNetmaskAmount of a Class C
/3042255.255.255.2521/64
/2986255.255.255.2481/32
/281614255.255.255.2401/16
/273230255.255.255.2241/8
/266462255.255.255.1921/4
/25128126255.255.255.1281/2
/24256254255.255.255.01
/23512510255.255.254.02
/2210241022255.255.252.04
/2120482046255.255.248.08
/2040964094255.255.240.016
/1981928190255.255.224.032
/181638416382255.255.192.064
/173276832766255.255.128.0128
/166553665534255.255.0.0256


Guide to sub-class C blocks

/25 -- 2 Subnets -- 126 Hosts/Subnet
Network #IP RangeBroadcast
.0.1-.126.127
.128.129-.254.255
/30 -- 64 Subnets -- 2 Hosts/Subnet
 
Network #IP RangeBroadcast
.0.1-.2.3
.4.5-.6.7
.8.9-.10.11
.12.13-.14.15
.16.17-.18.19
.20.21-.22.23
.24.25-.26.27
.28.29-.30.31
.32.33-.34.35
.36.37-.38.39
.40.41-.42.43
.44.45-.46.47
.48.49-.50.51
.52.53-.54.55
.56.57-.58.59
.60.61-.62.63
.64.65-.66.67
.68.69-.70.71
.72.73-.74.75
.76.77-.78.79
.80.81-.82.83
.84.85-.86.87
.88.89-.90.91
.92.93-.94.95
.96.97-.98.99
.100.101-.102.103
.104.105-.106.107
.108.109-.110.111
.112.113-.114.115
.116.117-.118.119
.120.121-.122.123
.124.125-.126.127
.128.129-.130.131
.132.133-.134.135
.136.137-.138.139
.140.141-.142.143
.144.145-.146.147
.148.149-.150.151
.152.153-.154.155
.156.157-.158.159
.160.161-.162.163
.164.165-.166.167
.168.169-.170.171
.172.173-.174.175
.176.177-.178.179
.180.181-.182.183
.184.185-.186.187
.188.189-.190.191
.192.193-.194.195
.196.197-.198.199
.200.201-.202.203
.204.205-.206.207
.208.209-.210.211
.212.213-.214.215
.216.217-.218.219
.220.221-.222.223
.224.225-.226.227
.228.229-.230.231
.232.233-.234.235
.236.237-.238.239
.240.241-.242.243
.244.245-.246.247
.248.249-.250.251
.252.253-.254.255
/26 -- 4 Subnets -- 62 Hosts/Subnet
 
Network #IP RangeBroadcast
.0.1-.62.63
.64.65-.126.127
.128.129-.190.191
.192.193-.254.255
/27 -- 8 Subnets -- 30 Hosts/Subnet
 
Network #IP RangeBroadcast
.0.1-.30.31
.32.33-.62.63
.64.65-.94.95
.96.97-.126.127
.128.129-.158.159
.160.161-.190.191
.192.193-.222.223
.224.225-.254.255

/28 -- 16 Subnets -- 14 Hosts/Subnet
Network #IP RangeBroadcast
.0.1-.14.15
.16.17-.30.31
.32.33-.46.47
.48.49-.62.63
.64.65-.78.79
.80.81-.94.95
.96.97-.110.111
.112.113-.126.127
.128.129-.142.143
.144.145-.158.159
.160.161-.174.175
.176.177-.190.191
.192.193-.206.207
.208.209-.222.223
.224.225-.238.239
.240.241-.254.255

/29 -- 32 Subnets -- 6 Hosts/Subnet
Network #IP RangeBroadcast
.0.1-.6.7
.8.9-.14.15
.16.17-.22.23
.24.25-.30.31
.32.33-.38.39
.40.41-.46.47
.48.49-.54.55
.56.57-.62.63
.64.65-.70.71
.72.73-.78.79
.80.81-.86.87
.88.89-.94.95
.96.97-.102.103
.104.105-.110.111
.112.113-.118.119
.120.121-.126.127
.128.129-.134.135
.136.137-.142.143
.144.145-.150.151
.152.153-.158.159
.160.161-.166.167
.168.169-.174.175
.176.177-.182.183
.184.185-.190.191
.192.193-.198.199
.200.201-.206.207
.208.209-.214.215
.216.217-.222.223
.224.225-.230.231
.232.233-.238.239
.240.241-.246.247
.248.249-.254.255

11.7.19

Windows 10 - Updates


Use Snip & Sketch to capture, mark up, and share images

Windows logo key + Shift + S


Add emoji from your keyboard

Press Windows logo key  + period (.) to open an emoji panel.

8.7.19

Issues opening Excel attachments

Clear Outlook’s Secure Temp folder

Main possible cause that Excel attachments are not opening correctly or with an error is because of other Excel files or templates in Outlook’s Secure Temp folder. 
The Secure Temp folder is the folder that Outlook uses to (temporarily) store attachments to that are being opened directly from within Outlook. Under certain conditions, this Secure Temp folder is not always cleaned correctly. 
In that case, you can clean it manually and see if the attachment is opened correctly now.

Outlook Secure Temp folder
Step 1: Locate the folder
The folder location is stored in the registry in the following key;
Outlook 97HKEY_CURRENT_USER\Software\Microsoft\Office\8.0\Outlook\Security
Outlook 98HKEY_CURRENT_USER\Software\Microsoft\Office\8.5\Outlook\Security
Outlook 2000HKEY_CURRENT_USER\Software\Microsoft\Office\9.0\Outlook\Security
Outlook 2002/XPHKEY_CURRENT_USER\Software\Microsoft\Office\10.0\Outlook\Security
Outlook 2003HKEY_CURRENT_USER\Software\Microsoft\Office\11.0\Outlook\Security
Outlook 2007HKEY_CURRENT_USER\Software\Microsoft\Office\12.0\Outlook\Security
Outlook 2010HKEY_CURRENT_USER\Software\Microsoft\Office\14.0\Outlook\Security
Outlook 2013HKEY_CURRENT_USER\Software\Microsoft\Office\15.0\Outlook\Security
Outlook 2016HKEY_CURRENT_USER\Software\Microsoft\Office\16.0\Outlook\Security
Step 2: Get to the folder
  1. Open the OutlookSecureTempFolder registry key from the location provided in Step 1.
  2. Copy the path from the key.
  3. Open Explorer.
  4. Paste the address in the Address Bar and press Enter.
Paste the found OutlookSecureTempFolder path in the address bar of File Explorer to easily get to the folder.
Paste the found path in the address bar of File Explorer to easily get to the folder.


26.6.19

outlook 2010 signature not working in Windows 10


In Windows 10, Open Settings-> Apps & Features -> Microsoft Office Desktop apps -> Click Advanced options -> Scroll to bottom -> Select Outlook and click [uninstall].

After the above step please try to set Signature..

20.6.19

Fix Windows Resource Protection could not start the repair service error


System File Checker or sfc.exe is a utility in Microsoft Windows located in C:\Windows\System32 folder. This utility allows users to scan for and restore corrupt Windows system files.

>> 1 >>
Start 'Windows Module Installer Service'

Then try to run the command again.....


>> 2 >>
Windows + X keys together and then selecting Command Prompt (Admin)option from the Power user menu, Type command : sc config trustedinstaller start=auto press enter.

Then you should get a Success message like “[SC] ChangeServiceConfig SUCCESS After that, enter the following command and press the Enter key: net start trustedinstaller After entering the above command line, you should receive a message “The Windows Modules Installer service was started successfully“. Now you can try opening the system file checker or sfc.exe on your computer as it will start easily.

18.5.19

System Info`


For check the system hardware details,


msinfo32.exe

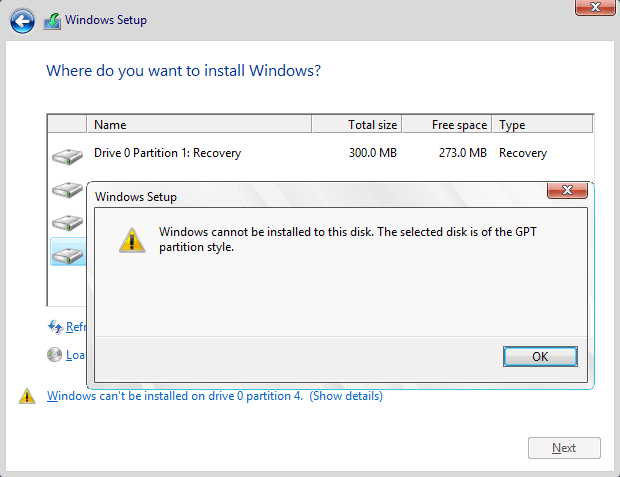
Fix – The Selected Disk is of the GPT Partition Style


Fix – The Selected Disk is of the GPT Partition Style

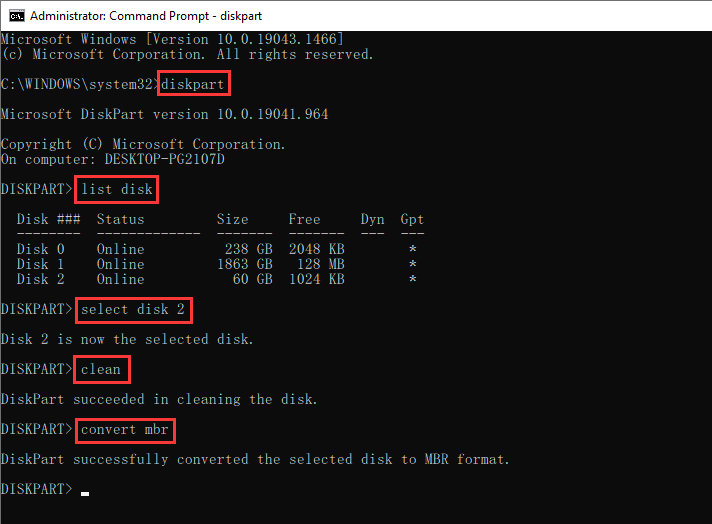
Solution 1: Wipe hard drive and convert to MBR using Diskpart
Step 1  Press keys Shift + F10 when you see the "The selected disk is of the GPT partition style" error during system installation, which opens Command Prompt. If that does not work, please go back to the first screen of the installation and press Shift + F10.
Step 2  Type diskpart in the command prompt and press Enter.
Step 3  Type command list disk and press Enter, which lists all disks connected to your computer.
Step 4  Type select disk # and press Enter. Replace # with the disk number representing the hard disk which is of GPT partition style.
Step 5  Type clean and press Enter. This command deleted all partitions and data from the selected disk.
Step 6  Type convert mbr and press Enter. This command convert disk to MBR format. You can exit Command Prompt when you see "DiskPart successfully converted selected disk to MBR format".
Fix – The Selected Disk is of the GPT Partition Style

Solution 2: Convert GPT disk to MBR without data loss
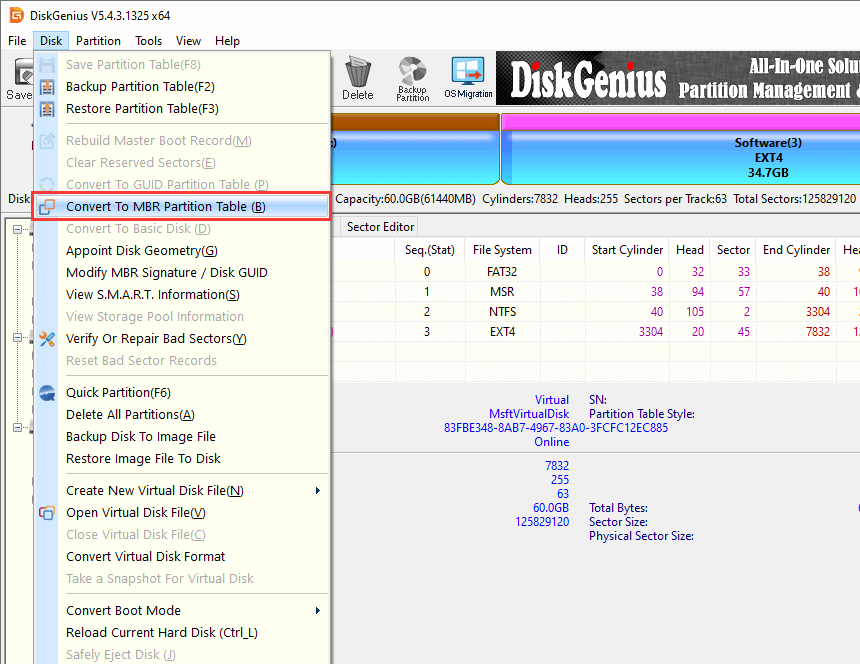
This method used third-party partition management software – Eassos DiskGenius to convert GPT to MBR. This tool lets you convert disk between GPT and MBR without losing data and the process is quite easy.
Step 1  Download, install and launch DiskGenius.
Step 2  Select the disk you want to convert, click menu Disk and choose Convert to MBR Partition Table.
Fix – The Selected Disk is of the GPT Partition Style
Step 3  Click OK when DiskGenius asks for confirmation to the operation.
Fix – The Selected Disk is of the GPT Partition Style
Step 4  Click Save All from toolbar to save changes to partition table.
Step 5  Try installing Windows again to check if the error is fixed.

18.4.19

Offline Address Book Fails to Download in Exchange 2010

I found that this was caused by the configuration of the redirect changing the security permissions on the web.config file within the OAB virtual directory.   To fix the problem, browse to the OAB virtual directory and re-add the authenticated users group to "read" and "read and execute" permissions on the web.config file.    

Here are the corrected permissions:  

I hope this helps everyone out!