Open Terminal...
SUDO apt-get install remmina /f remmina-plugin-rdp
....................................
Open Terminal...
SUDO apt-get install remmina /f remmina-plugin-rdp
....................................
Open gpedit.msc
User Configuration --- Administrative Templates --- All settings --- Don't run specified windows applications...
Enable the settings... and select the applications...
---------------------------------------------------------------------------------------------
For copy a directory with subdirectories and files to another location....
XCOPY c:\folder\*.* d:\newfolder /E
-------------------------------------------------------------
Resolution
To solve this you need to change your installation of Microsoft Office.
After the installation, your Office Connector software will be able to function in Excel.
Universal desktop program icon/shortcuts are located in C:\Users\Public\Desktop.
To work around this, go into C:\Users\Public\Desktop and delete all the program icons.
-----------------------------
Open CMD in Administrative mode..
Type DISKPART
AUTOMOUNT ENABLE
Exit and close command prompt and connect external drive...
Hikvision error code 800 shows up on the iVMS-4200 when you try to access the live view or playback your security cameras. The full error message shows as Playback failed. Error code: HCNetSDK.dll[800].
Error code 800 is related to an insufficient bandwidth which means the iVMS-4200 software cannot handle the bandwidth coming from the all cameras. Maybe you’re trying to pull the feed from too many cameras at the same time or maybe your local network is overwhelmed. Additionally, there may be many clients (users) who are watching the cameras at the same time.
1.
Type the IP address of your recorder or camera, go to Configuration and then Video&Audio. Here you can adjust the max. Bitrate and the frame rate. Lower them a little bit and then see if the error code 800 goes away.
 2.
2.
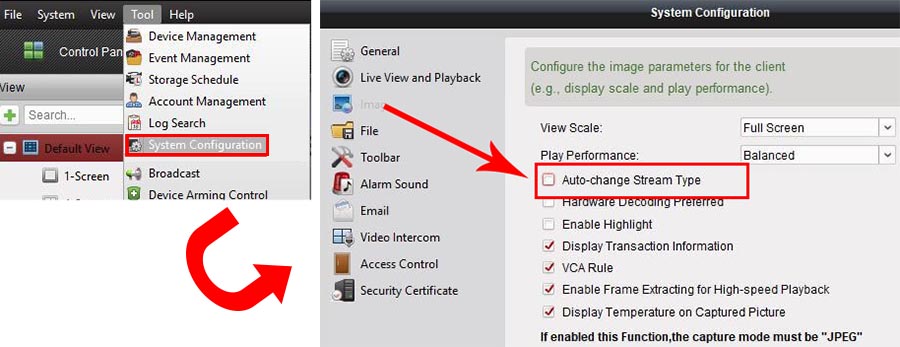
To fix the 800 error code, open up the iVMS-4200 software, go to Tool and then System Configuration. Access the Image section and untick Auto-change Stream Type (check the picture below).
3.
4.
5.
1. Save the file to the disk.
2. Right click on the file and select Properties.

3. Click on the UNBLOCK check box in the Security option and click Ok.
4. Try again to open the file...
WiFi repeaters and WiFi extenders both improve your WiFi signal and range, however, they do it in different ways. A WiFi extender connects directly to your router and creates a new WiFi network. A WiFi repeater connects to your network wirelessly and rebroadcasts your existing network signal.

A WiFi repeater is a type of network booster that expands the range of your WiFi signal. It has antennas that receive a WiFi signal from your router, just like your smartphone or laptop. Then it rebroadcasts that signal over a wider area.
While a WiFi repeater will expand the range of your WiFi signal, it will also make your WiFi signal weaker. Since a WiFi repeater creates a new network that you have to connect to, it will reduce your network’s bandwidth by 50%. That means your devices might be slower, especially if you are streaming or transferring large files over your network.

Most WiFi repeaters simply plug into an outlet, however, you need to place it in a location that already has a WiFi signal. If you put a WiFi repeater in an area with a weak WiFi connection, it will only be able to rebroadcast that signal at half the strength.
Since WiFi repeaters are wireless, your WiFi signal will also be weakened by thick walls, microwaves, metal objects, and electronic devices that are in between your router and WiFi repeater. So, WiFi repeaters are not great for boosting your WiFi signal over long distances or in large homes or offices, especially if there is more than one floor.
You might want to get a WiFi repeater if your garage doesn’t get a strong WIFi signal. Then you can plug the repeater somewhere in between your garage and router. This will allow you to install a smart garage door opener and connect it to the 2nd WiFi network that the repeater creates.
A WiFi extender is a type of WiFi booster that extends your main router’s internet signal to another location. It connects to your home network via an Ethernet cable or coaxial cable. Basically, it’s like adding another router to any WiFi “dead zone” in your home.
Because a WiFi extender uses a wired connection, it does not reduce your bandwidth or get weaker from thick walls or radio waves like a WiFi repeater does. Also, you will not need to sign in to different WiFi networks with an extender.

Since it uses a wired connection, a WiFi extender is a good option for “dead zones” or areas in your home that receive zero internet signal. However, WiFi extenders are usually more expensive and complicated to set up than WiFi repeaters.
A WiFi repeater might not give you good connectivity in a basement game room because of the thick floor. But with a wired WiFi extender, you will be able to go online in the basement without any issues because interference will not be a problem.
A WiFi booster is a general term for both WiFi repeaters and WiFi extenders. Since both devices boost your network’s signal, you will see WiFi repeaters and WiFi extender called WiFi boosters.
If you want to expand the range of your WiFi network to a few rooms, you might want to get a WiFi repeater. However, if you want to extend your WiFi signal to a distant location, you might want to get a WiFi extender. There are also lots of devices that work as both repeaters and extenders.
Open "Proxy Settings" from windows search box...


Replace <accountname> with the real username. In case you do not know the exact name, type “net user“, and hit the enter key.
The following steps could speed up the RDP connection:
The policy that helps to speedup the remote connections (this settings is on client):
Computer Configuration\Windows Settings\Security Settings\Public Key Policies\Certificate Path Validation Settings
on Network Retrieval check the "Define these policy settings" and uncheck both settings below.
Now the RDP Connections are speeded up!!
To access the AutoComplete setting, follow these steps:
On the File menu, select Options.
Select the Mail tab.
Scroll approximately halfway down until you see Send messages. Make sure that the Use Auto-Complete List to suggest names when typing in the To, Cc, and Bcc lines box is checked.

To access the AutoComplete settings, follow the steps:
Select Tools, and then select Options.
Select the E-mail options button.
Select the Advanced E-mail Options button.
Make sure that the Suggest names while completing To, Cc, and Bcc fields box is checked. (The screenshot for this step follows.)

Use one of the following two methods to delete the AutoComplete list.
Method 1
Open Outlook.
On the File tab, select Options.
Select the Mail tab.
Under Send Messages, select Empty Auto-Complete List.
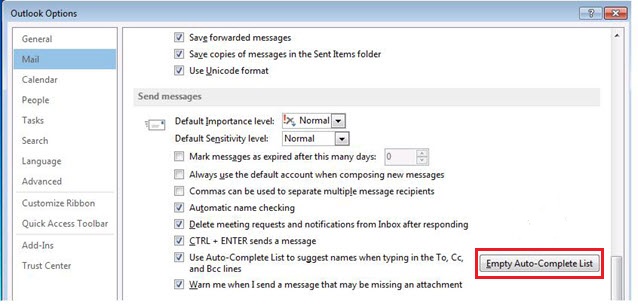
Select Yes.
Method 2
Start Outlook by using the /CleanAutoCompleteCache switch. To do this, follow these steps:
To delete the AutoComplete list in Outlook 2003 and Outlook 2007, you must manually delete the .nk2 file. To delete the .nk2 file, follow these steps:
Exit Outlook.
Select Start, and then select Computer.
Select Organize, and then select Folder and search options.
On the View tab, select Show hidden files, folders, and drives.
Select OK.
Select Start, select All Programs, select Accessories, and then select Run.
In the Run dialog box, type the following command (including the quotation marks), and then select OK:
C:\ Users\UserName\AppData\Roaming\Microsoft\Outlook
Note
Username in this path is the name of the currently logged on Windows user.
Right-click the .NK2 file that has name of the profile that you want to reset, and then select Rename.
Rename the file as profilename.bak, and then press Enter.
Start Outlook.
Method 1.
1. Open Management option by right click on This PC.
2. Select Disk Management
3. If the drive is shown there, right click on the drive and add a drive letter.
4. Open My computer and check the drive is shown or not..
Method 2.
1. Open services.msc
2. Search for Virtual Disk service.
3. Change the start-up type to automatic and click start.
Method 3.
1. Run the Command prompt in Admin mode.
2. Type the following commands..
DISKPART
AUTOMOUNT (It dispalys the status, enabled or disabled)
AUTOMOUNT ENABLE
AUTOMOUNT SCRUB (If automount enabled, this command will clear the associations of system drive letters)
EXIT
3. Restart the system and reconnect the drive.
Open Tally ERP 9
Login to company with Admin username and password.
Select Company Info (Alt + F3)
Select Alter
In the Security Control section, we can change the password.
--------------------------------------------------------------------------------
Login to tallysolutions.com using your admin mail id.
Select Control Centre - User Management - Manage Users

In Tally server, login with Admin account and create a new tally.net user
Enable remote access for this user..
In next step, open Tally in your client machine, and select remote user login

Open CMD and type the following command..
wmic memphysical get maxcapacity
-------------------------------------------------------
In server, login to Tally ERP 9 as Admin user account.
Select SECURITY CONTROL... User Management... Users and Password..
Create a new Tally .NET user with server activation mail id..
Then please open Control Center..
Then select License Management..
In this windows , please check the company status as ACTIVE or not..
Please change to ACTIVE..
Press F4 for connect / dis connect from remote session..
----------
In client machine, login with remote tally user, using the mail id and password..
NB:- Need to open and login to Tally with admin account in Server for access it from remote..
| Comparison between Internet Leased Line & Traditional Broadband Internet | ||
| Parameter | Internet Leased Line (ILL) | Broadband (FTTH/xDSL/Mobile Internet) |
| Customer Connectivity | Dedicated connection between client premises and service provider | Connection shared with other users |
| Cost | Costlier than Broadband | Cheaper than ILL |
| Maximum Speed | Order of Gbps | Order of Mbps |
| Performance | High Performance | Average Performance |
| Upload & Download Speed | Symmetric : Same Upload & Download Speed | Asymmetric : Download speed is higher as compared to Upload Speed |
| QoS | High QoS | Low QoS |
| Uncontended Bandwidth | Directly connected to Packet Core Network of ISP | A shared access network comes in between Customer Premise Equipment and ISP's Core Network |
| SLA (Service Level Agreement) | Yes. Better network uptime and better network availability | No. Service delivery in best effort basis |
| Customer Segment | Enterprise Business | Ordinary Customers |
| Static IP Address | Provided with ILL without additional cost | Provided at additional cost |
| Media | OFC | OFC/Copper/Wireless |
| Security | High, because the connection is dedicated to a particular client | Low, because the connection is shared by multiple users |
| Contract Period | One Year (Minimum) | One Month (Minimum) |
| Metering / Throttling | Un-metered and Un-throttled. TRULY Unlimited | Metered. FUP will be there |
| Monitoring and Pro-active Support | 24 Hrs Monitoring and Pro-active support | No monitoring. Faults will be attended only after reporting |
| Connection Speed | Committed & Fixed | On Best Effort Basis |
| Latency and Jitter | Low Latency & Low Jitter | High Latency & Jitter |
| Traffic Prioritization | Traffic prioritization done by ISPs | No Traffic Prioritization |
| Route Diversity Options | Traffic Route can be diverted in the event of failure | No traffic diversion option |
To disable access to certain apps on Windows 10 with Group Policy, use these steps:
Browse the following path:
User Configuration > Administrative Templates > System
On the right side, double-click the Don't run specified Windows applications policy.

Click the Show button.

