21.7.21

Remote desktop connection to a server takes very long time to connect

 The following steps could speed up the RDP connection:

1. Open Network Connections in the configuration panel.
2. Right-click the icon of the network interface which is responsible for the connection to your server and select Properties.
3. In the Networking tab, click on the Configure… button.
4. In the next window, switch to the Advanced tab.
5. Click the Large Send Offload Version 2 (IPv4) and change the value to Disabled.
6. Click Start > click Run > type regedit and then click OK.
7. Locate and then click the following registry subkey:
HKEY_LOCAL_MACHINE\SYSTEM\CurrentControlSet\Services\Tcpip\Parameters
8. In the right pane, make sure that the DisableTaskOffload registry entry exists. If this entry does not exist, add the entry:
DWORD Value: DisableTaskOffload
Value Data: 1
9. Exit Registry Editor.
The following commands need to be entered through the command shell.
Which you can enter by doing: start > run > enter cmd.
netsh interface tcp set global autotuninglevel=disabled
and
netsh interface tcp set global autotuninglevel=highlyrestricted


==================================================================


The policy that helps to speedup the remote connections (this settings is on client):

Computer Configuration\Windows Settings\Security Settings\Public Key Policies\Certificate Path Validation Settings

on Network Retrieval check the "Define these policy settings" and uncheck both  settings below.

Now the RDP Connections are speeded up!!

Information about the Outlook AutoComplete list


Outlook 2010, Outlook 2013, Outlook 2016, and Outlook 2019

To access the AutoComplete setting, follow these steps:

  1. On the File  menu, select Options.

  2. Select the Mail tab.

  3. Scroll approximately halfway down until you see Send messages. Make sure that the Use Auto-Complete List to suggest names when typing in the To, Cc, and Bcc lines box is checked.

    Send messages window, Use Auto-Complete List to suggest names when typing in the To, Cc, and Bcc lines box checked

Outlook 2003 and Outlook 2007

To access the AutoComplete settings, follow the steps:

  1. Select Tools, and then select Options.

  2. Select the E-mail options button.

  3. Select the Advanced E-mail Options button.

  4. Make sure that the Suggest names while completing To, Cc, and Bcc fields  box is checked. (The screenshot for this step follows.)

    Advanced E-mail Options window, Suggest names while completing To, Cc, and Bcc fields checked


How to clear the whole AutoComplete list


Outlook 2010, Outlook 2013, Outlook 2016, and Outlook 2019

Use one of the following two methods to delete the AutoComplete list.

Method 1

  1. Open Outlook.

  2. On the File tab, select Options.

  3. Select the Mail tab.

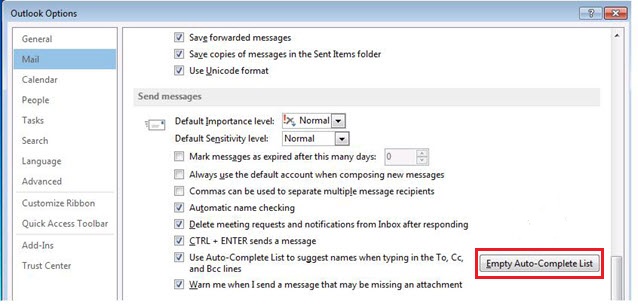
  4. Under Send Messages, select Empty Auto-Complete List.

    Outlook Options window

  5. Select Yes.

Method 2

Start Outlook by using the /CleanAutoCompleteCache switch. To do this, follow these steps:

  1. Select Start, and then select Run.
  2. Type Outlook.exe /CleanAutoCompleteCache.

Outlook 2007 and Outlook 2003

To delete the AutoComplete list in Outlook 2003 and Outlook 2007, you must manually delete the .nk2 file. To delete the .nk2 file, follow these steps:

  1. Exit Outlook.

  2. Select Start, and then select Computer.

  3. Select Organize, and then select Folder and search options.

  4. On the View tab, select Show hidden files, folders, and drives.

  5. Select OK.

  6. Select Start, select All Programs, select Accessories, and then select Run.

  7. In the Run dialog box, type the following command (including the quotation marks), and then select OK:

    C:\ Users\UserName\AppData\Roaming\Microsoft\Outlook

     Note

    Username in this path is the name of the currently logged on Windows user.

  8. Right-click the .NK2 file that has name of the profile that you want to reset, and then select Rename.

  9. Rename the file as profilename.bak, and then press Enter.

  10. Start Outlook.

20.7.21

No drive letter for USB attached drives in My computer- Windows 10

Method 1.

1. Open Management option by right click on This PC.

2. Select Disk Management

3. If the drive is shown there, right click on the drive and add a drive letter.

4. Open My computer and check the drive is shown or not..


Method 2.

1. Open services.msc

2. Search for Virtual Disk service.

3. Change the start-up type to automatic and click start.


Method 3.

1. Run the Command prompt in Admin mode.

2. Type the following commands..

        DISKPART

        AUTOMOUNT (It dispalys the status, enabled or disabled)

        AUTOMOUNT ENABLE

        AUTOMOUNT SCRUB (If automount enabled, this command will clear the associations of system drive letters)

        EXIT

3. Restart the system and reconnect the drive.